Wise 2086 standard switch ergonomic upgrade

Discussion in 'Badminton Stringing Techniques & Tools' started by CET Stringer, Nov 20, 2016.

  1. CET Stringer

    CET Stringer New Member

    Joined:
    Sep 25, 2016
    Messages:
    13
    Likes Received:
    1
    Location:
    Melbourne
    Hi,
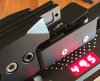
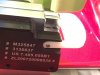
    I was a bit frustrated with the ergonomics of the standard switch behind the gripper of the Wise 2086 tension head. Was just hard to find the little red button.
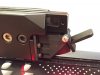
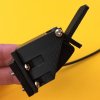
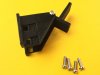
    I have made a 3D printed assembly of two parts which can fit over the standard switch and make hitting the button very easy and ergonomic. It is basically a bracket which fits over the switch and a small lever which has a contact srface to the switch and a lever which site just behind the gripper plates.
    If anyone is interested send me PM.
     

    Attached Files:

    DarthHowie likes this.
  2. DuckFeet

    DuckFeet Regular Member

    Joined:
    Feb 22, 2012
    Messages:
    2,033
    Likes Received:
    320
    Occupation:
    Computer rebooter
    Location:
    Swindon
    Price inc postage to UK please! I'm happy with current setup but this looks good, and I imagine other people will ask price too.
     
  3. FeatherBlaster

    FeatherBlaster Regular Member

    Joined:
    Mar 23, 2014
    Messages:
    920
    Likes Received:
    323
    Location:
    Denmark
    I think the basic idea of 3D printing is that you don't really send parcels. But simply get the design file and print the object locally.
    So get in touch with someone in UK with a 3D printer, and make the proper arrangements, then you save like X times overseas postage. And you save delivery time :)
    #JustSaying
     
    DuckFeet likes this.
  4. FeatherBlaster

    FeatherBlaster Regular Member

    Joined:
    Mar 23, 2014
    Messages:
    920
    Likes Received:
    323
    Location:
    Denmark
    Look like a nice upgrade BTW CET Stringer!
    :)
     
  5. Chow Mein

    Chow Mein Regular Member

    Joined:
    Aug 8, 2005
    Messages:
    96
    Likes Received:
    19
    Location:
    Montreal
    Props for posting about this.

    I have no feedback on the actual parts the original poster is referring to, but the same concept has been shared on www.thingiverse.com, just search for wise 2086. I printed those 2 other ones out and they require a bolt and nut. My inital feedback is it feels like it would snap at the slightest abuse.

    Totally worth a try as a minimal cost approach if you have access to a 3D printer..
     
    #5 Chow Mein, Nov 22, 2016
    Last edited: Nov 22, 2016
    DarthHowie likes this.
  6. CET Stringer

    CET Stringer New Member

    Joined:
    Sep 25, 2016
    Messages:
    13
    Likes Received:
    1
    Location:
    Melbourne
    Hi all,

    Shipping from Australia to the UK is not economical, Australia Post wants $20 as the parts dimensions are too high to fit in a letter (20mm max).

    The Thingiverse parts are the same concept but I agree, they are not strong enough, that is the resason why I redesigned them and made them strong enough for continuous use. The bracket I use has a different shape and is twice a thick material, the lever has different dimensions too. Also true 4 new longer screw M3 x 12 mm are required and another screw M3 x 26 for assembly of the two 3D prnted parts.
     
  7. Chow Mein

    Chow Mein Regular Member

    Joined:
    Aug 8, 2005
    Messages:
    96
    Likes Received:
    19
    Location:
    Montreal
    Good work on your design, from the pics it definitely looks beefier than the second one on Thingiverse. Do you print them with PLA or ABS?
    You're going to get lots of emails from people asking for the STL files...hahahahhaa!

    $20 AUD shipping is pretty crazy. For my custom wise switches I use a 4"x2"x2" box in a "No. 0" bubble mailer envelope and shipping worldwide from Canada is around half of that.
     
  8. CET Stringer

    CET Stringer New Member

    Joined:
    Sep 25, 2016
    Messages:
    13
    Likes Received:
    1
    Location:
    Melbourne
    Australia Post defines anything thicker than 20mm as parcel, and the heapest parcel to UK is $20, absolutely rippoff! The small plastic parts is about 25-30 in the smallest extension and need to be in a box not bigger than 4x5x5 cm but that does not help with the Australia post rates.

    I actually also have made a switch assembly based on the switch you use with the difference that I mount it with a bracket using the two mounting holes on the switch not the lectrical terminal at the bottom. Picture here:
     

    Attached Files:

  9. CET Stringer

    CET Stringer New Member

    Joined:
    Sep 25, 2016
    Messages:
    13
    Likes Received:
    1
    Location:
    Melbourne
    I actually would hope that the desiger of the Wise changes the design of the gripper by extending the two side plates and mount a proper plastic switch plate (plastic) and a microswitch between them. With the switch plate having a mechanical end stop and not using the switch mechanics as the mechanical limits. That would be proper and probably cheapet that the sepearte switch they make and also better than out add-ons. Here image of such a design.
     

    Attached Files:

  10. Chow Mein

    Chow Mein Regular Member

    Joined:
    Aug 8, 2005
    Messages:
    96
    Likes Received:
    19
    Location:
    Montreal
    Nice work on your switch, nice to see different mounting solutions, looks pretty tricked out. Does string occasionally get caught in those gaps?

    I do not use the electrical terminals at the bottom for mounting in any way.


  11. CET Stringer

    CET Stringer New Member

    Joined:
    Sep 25, 2016
    Messages:
    13
    Likes Received:
    1
    Location:
    Melbourne
    Hi Chow Mein,
    No the gaps are no problem, might not be so clear in the images, the switch is super ergonomic and the small square plate actually is having a hard stop at the bracket sides so the electrical switch is never overstrained.
    Since the owner Herb died the now in Chinese owners did signifficant internal updates with version 12, optic switches and a additional internal linear guide. If they would fix the remaining two issues, to incorporate the switch in the gripper and to make the gripper parts from steel, it would be quite perfect.
    Sorry for guessing you used one of the terminal scrw to mount it, got confused with another switch, is your design ising a 3D printed bracket and zip ties?
     

Share This Page